Thursday, February 14, 2013
Very Valentine
I love doing elaborate Valentines with the kids because it's like justified crafting for me. I found a couple of cute airplane valentines online this year. Both were cute and required much folding. Incidentally, I'm all caught up on my Hulu shows.
But Alden looked through my Valentines Pinterest board and wanted something like this:
We decided to glue mechanical pencils to the backs of the arrows and stick them into pink erasers. But did you know those erasers are like 50 cents each? And mechanical pencils aren't cheap either. So I opened up Illustrator and designed my own Valentines. And ended up with these. Hot glue holds the pencils on and suprisingly holds the arrows straight up too.
Roland was willing to practice his writing and addressed and wrote individual notes on 18 Valentines for preschool. He would tell me what he wanted to say, I'd write it on scratch paper and he would copy it onto the Valentine. That kid is going to write for Hallmark someday. Some of my favorites were:
You are kind of tough.
Sometimes I like your shirt.
You can do an awesome flip.
I like your voice.
I like that we are both 5.
Sometimes you say oopsy daisy and I like that word.
Man, I love that kid.
Tuesday, October 30, 2012
Pinterest Project 02
Tuesday, July 10, 2012
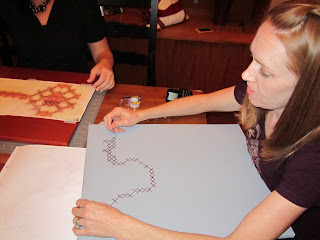
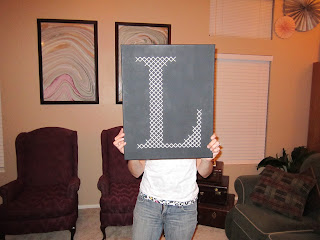
Craft Night: Giant Cross Stitch
Next I spray painted my canvas, although most of my friends used craft paint and a foam brush. I would love to try one over fabric, like a burlap or a small-print flowered muslim or something. It would be harder to mark where the stitches should go, but I did buy a fabric ink pen, with disappearing ink. I'm anxious to try it soon. I would recommend wrapping and stapling the fabric to a canvas, just to keep the structure and make it easier.
After the paint was dry on my canvas, I printed off my design, which necessitated multiple pages taped together sometimes, and attached it to the canvas with some of my washi tape, whose low-tack & removability were perfect for this project. Then I took a needle and drove it down through the paper & the canvas below. The hole remains in the canvas to show you where to stitch. That's where fabric would be a little trickier than the canvas, although that disappearing ink pen must be so much easier on the fingers than stabbing through the canvas with a needle. A thimble helped. I learned a few things on the first row. Don't stab through the middle of the Xs, only the corners. I made that mistake on the first row, but the holes were covered up when I did the stitching. Also, my design ran fairly close to the edge of the canvas, over the wooden supports, which made it pretty hard to put a needle through. You might keep that in mind when creating your design. My friends poster-size canvas had a support right up the middle too - which made it difficult to stitch around, but canvas is flexible and we worked around it.
Monday, March 12, 2012
A New Project
Perfect wingback lines, classic legs, and comfy cushions - still in good shape despite the dirty exterior. Truth be told: I love the flame stitch pattern! And I don't completely hate the color. It matches our rug perfectly, which is unfortunate since I'm not fond of the rug & would like to get rid of it. But it also matches the pink in our artwork, which matches the green in the couches. But eventually I'd like to replace those couches too so we have a lot of scheming to do.
I have convinced myself that I can recover these chairs at home, after reading a bunch of posts like this, this, and this. I certainly can't afford to have them professionally done, so we'll be on the hunt for fabric soon. When my Mom asked what my husband wanted for his last birthday, I convinced him that his fondest wish was for new chair fabric. And the next month I asked my Mom for the same thing for my birthday so between her contributions and a little scrimping of our own we will start shopping soon. And I told Aaron that what I wanted for my birthday is for him to go fabric shopping with me. (I'm sure that gift will be coming along soon - 5 months later!) I have no idea what we're looking for... but I know I want a pattern, and probably a bolder color choice. Now if we can only figure out what that color might be.
We need to come up with some overall design decisions for our living room; things like color and style. I started Pinterest boards for ideas for the chairs and the entire room. Any suggestions?
Wednesday, October 5, 2011
Putting my party hat on...
My Mom takes care of the food, my Dad did invitations and all the coordinating, my aunt is making a video and will be the resident photographer, which leaves my sister and I to do the decorating. Naturally I turned to Pinterest (my boards are here) for a wealth of inspiration. After a little searching we decided on a metallic color palette - mixing gold, silver, copper, bronze, and whatever else we might find. Here's my to-do list:
- create a crossword about Gram
- centerpieces
- balloons
- food table decorations
- make a photo backdrop to document the guests
- party favors
- decorate a comfy chair for Gram to sit in during the party
- make a pretty crown for the birthday girl
All day yesterday I made paper rosettes to put together into a photo backdrop to help Gram remember the people that came to her party. I am using the ideas from here and here. I have learned a few things about making these pinwheel rosettes. Last weekend I bought a bunch of metallic papers, alarming my husband by how much I was spending ($11 whole dollars!). But once I started folding and looked up some directions I realized that I needed three to five sheets of each paper to make a pinwheel. Which takes my costs up quite a bit. I chose a few of my favorites and will take the rest back. And then I found a cheaper source - spray painted paper! I grabbed my silver, gold, and copper spray paints and my big roll of kraft paper and was able to make some very large, shiny rosettes. The kraft paper was brown, so the metallic effect over the top is a little subtler than I wanted so I turned to plain, white printer paper next. The metallic paint shows up much better over the white.
Tomorrow I'm working on centerpieces - stay tuned for more inspiration pics and a few of my own too.
Tuesday, April 5, 2011
DIY Bead Necklace
I had wanted to try this project and this week seemed the perfect time, so I could add the necklace to my April Outfit. I ran to Joanne's to buy beads, dye, and cord to string the beads. The instructions were easy, and by the end of the day I was wearing my necklace. See full directions on the Martha Stewart site here.
14 1/2"
24 9/16"
14 5/8"
22 3/4"
You string them on floral wire first to get the length you want and them dye them on the wire. The beads cost me about $10 total and the Rit dye was $2.50. (A sweet woman offered me an extra coupon for 25% off my purchase, which I was glad for because none of my items were on sale.) The MS website recommends using leather cord, which you can dye to match the beads, but I am cheap and bought a waxed cotton cord. I'm sure that would have dyed well also, but I didn't bother. The total cost was around $13 without coupons or sales. (Love my sweet neice as a model!)
In the end, I couldn't dump out 8 cups of beautiful blue dye, so I ended up dipping a bunch of paper coffee filters. I've seen a lot of amazing crafts made from these and had previously grabbed some at the grocery store so I dyed a few dozen, let them dry upside down to keep their shape, and stashed them away for the next project.
Wednesday, March 9, 2011
Why Do I Love Him?
Naturally, as soon as I finished my husband's gift for Valentine's Day, I've been seeing homemade versions of these all over blogland. But I'm pretty sure my sweet hubby appreciates his own anyway.
Monday, November 1, 2010
Stencilin' Craft Night
We mainly used tutorials & tips from Jess at How About Orange, and Dana at MADE. Specifically, I copied the Father's Day tie idea from Dana.
Wednesday, April 29, 2009
Does this make me look like a good photographer?

You can change settings to make it more look older or more rustic and you can capture the image at any point in the "development" stage.
Thursday, April 16, 2009
Tiling the easy way
2. Use a tool to pry the baseboards from the wall. I use a special, angled screwdriver with a claw tip, but a regular one will do in a pinch. I use a hammer to wedge it in, then push out the moulding. You just have to be careful not to damage your wall. That's why I like the angle of this tool, because I have more room for leverage. Some people want to save the baseboards to re-install, but I was tossing mine, so I didn't worry about them cracking, splintering, or breaking. Demolition is very satisfying.
3. Vacuum up all the detritus that ends up underneath your walls. Are you sad that I'm covering up this gorgeous linoleum?
The first step is to make sure the floor is clean and dry, no matter what you are laying the tile over. The vinyl tiles have adhesive backs, so you just stick them down, but if there's dirt or dust they won't stay down well.
It is important to map out how you will lay the tile before you start. It's nice to start with one tile in a corner, to make for less cutting, but that's not always the best idea. You need to make sure your last row of tiles isn't less than 4 inches or something (whatever the directions say). Here's an example. This is my bathroom, roughly. I actually laid these tiles out, without attaching them. The figure on the left shows that the last tile will need to be cut a little. The figure on the right shows that the last tile will be a little short. And rather than have a small tile, it is better to cut the tiles on both ends of the row.
You need to do the same for the width and length of the room. If your walls are not square you can end up with rows of tile that don't align with the walls. This is a bigger issue when you are tiling a larger room. With vinyl tiles that just match up to each other in the seams you can start in the middle of the room if you want. You don't have that luxury with tongue and groove flooring like laminate.
And now comes the cutting:
It's pretty satisfying to lay down whole tiles and you cover the area very quickly. And you can do all the whole tiles first if you want. But at some point you will get to the edges and need to cut a tile to fit. Vinyl tiles can be cute with heavy scissors, a utility knife, etc. The scissors worked the best for me. But even with a small bathroom my hands were sore and almost blistered the next day from the cutting - it's hard work! Straight line cuts are pretty easy. I used a measuring tape, a dry erase marker, and a straight edge. You can just measure the area you need to fill, mark it on the tile, and cut.
The official method of cutting tiles (of any material) is as follows:
* Lay a loose tile directly over the last tile in the row
* Lay another loose tile flat against the wall/bathtub/flat edge, overlapping the first loose tile
* Draw/cut along the line where the two loose tiles meet
The hardest part of laying tile comes when you need to cut for irregular objects. For bathrooms the round toilet base can be tricky. Vinyl tiles have an advantage over other tiles because you can do a curved cut. I will tell you how I fit these tiles, but I'm sure there are better ways. I was glad my tiles were only $1 each because I did start over a couple times.
I cut the tile down to roughly the correct size if necessary, then cut out the curved shape I needed. I totally free handed it, drawing the shape as shown, and then cutting in down again and again until it fit well. This is why my cutting hand was sore. Does anyone know a better way than this? It was labor intensive, but it worked for me since there were only a few tiles to cut this way.
When you finish all the tile, you can choose to caulk the edge in some spots. I caulked along the tub and around the base of the toilet. i just bought white bathroom caulk and followed the instructions roughly, although I use my fingers to smooth.
Here's a shot of the finished product. The new baseboard against the right wall was just laid in place to see how it would look. Watch for my upcoming post on installing baseboards! It's already half-way written.
Please check out my other Do It Herself projects. I'm very proud of them!
I submitted this post to DIY Day at A Soft Place to Land.